


This tutorial shows how to create recurrences and reminders either programmatically or by using the built-in forms.
1. Initial preparations
Follow the steps described in Tutorial1: Creating appointments and Tutorial 2: Filtering and grouping.
2. Create a reminder
Switch to code view and add the following code at the end of CreateScheduleData method:
C#
 Copy Code Copy Code
|
|---|
Reminder reminder = new Reminder(); |
| Visual Basic
Copy Code
|
|---|
Dim reminder As New Reminder() |
This code creates a Reminder that will trigger 15 minutes before the corresponding appointment's start time.
In order to show reminder messages, you must handle the Calendar's ItemReminderTriggered event. Switch to 'Design view' and find the 'Client events' section in the 'Properties' pane of the control. Set the value of the ItemReminderTriggeredScript property to 'onReminder' - this will be the name of the JavaScript function that will handle the event. Add the following code to the *.aspx file that contains the Calendar control:
| JavaScript
Copy Code
|
|---|
<script type="text/javascript"> |
3. Create a recurrence
Switch to code view and add the following code at the end of CreateScheduleData method:
| C#
Copy Code
|
|---|
Recurrence recurrence1 = new Recurrence() Recurrence recurrence2 = new Recurrence() |
| Visual Basic
Copy Code
|
|---|
Dim recurrence1 As New Recurrence() With { _ Dim recurrence2 As New Recurrence() With { _ |
This code creates two Recurrence objects. The first Recurrence has a daily pattern with occurrences on every working day and it's end date set to a specific date. The second one has a weekly pattern with occurrences every Monday and Wednesday and will end after a specified number of occurrences is reached.
Recurrences can also be created during run-time by using the built-in RecurrenceForm. Here a snapshot of the form set to create a weekly recurrence.

4. Change displayed dates
Switch to code view and add the following code to the Page_Load event handler, right above the call of the CreateScheduleData method:
| C#
Copy Code
|
|---|
DateTime startDate = DateTime.Now; while (startDate < endDate) |
| Visual Basic
Copy Code
|
|---|
Dim startDate As DateTime = DateTime.Now |
This code will add six new dates to the collection of displayed dates in the Timetable.
5. Handle the SelectionEnd event
In order to change easily the displayed dates in run-time we will add another Calendar and use it as a date range selector. Add a second Calendar control to the page and set its ID to 'Calendar2', CurrentView property to SingleMonth and Theme to Vista. Set the UseForms property to false, then expand the 'ItemSettings' section and set the ShowMoreItemsCue and ItemsVisible properties to Disabled. These changes will ensure items could not be created or be visible in this calendar. Set the SelectionEndScript property to 'onSelectionEnd' - this will be the name of the JavaScript function that will handle the event. Add the event-handling code somewhere in the *.aspx file, for example after the 'onReminder' method:
| JavaScript
Copy Code
|
|---|
function onSelectionEnd(sender, args) { |
This code will postback the page every time the client-side SelectionEnd event is triggered. Once the page is posted back to the server we will be able to read the range of selected dates in the second calendar and add it as a range of displayed dates in the main calendar.
Switch to code view and add the following code in the Page_Load event handler, right after the if (!IsPostBack) block:
| C#
Copy Code
|
|---|
else |
| Visual Basic
Copy Code
|
|---|
Else |
This code checks if there is any selected range in the second calendar, and if so creates and adds the new range of dates to the main Calendar's displayed dates collection.
6. Run the tutorial
Build and run the tutorial. The image below depicts how the output should look like:
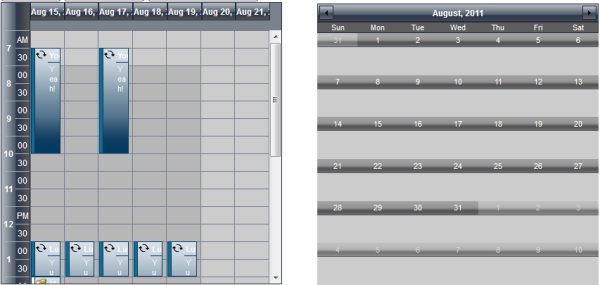
Select arbitrary dates and date ranges in the calendar to the right to see how the displayed dates collection in the calendar to the left updates to the corresponding range.