


This tutorial will help you create a very simple data-bound report from scratch. The following steps are explained in more details below:
- Creating a new project
- Adding a MindFusion report to the project
- Adding a data source to the project
- Instantiating the report
- Adding the data source to the MindFusion report
- Creating a data-bound DataRange
- Displaying the report
- Running the application
1. Creating a new project
From MS Visual Studio select the File -> New -> Project menu command in order to create a new project.
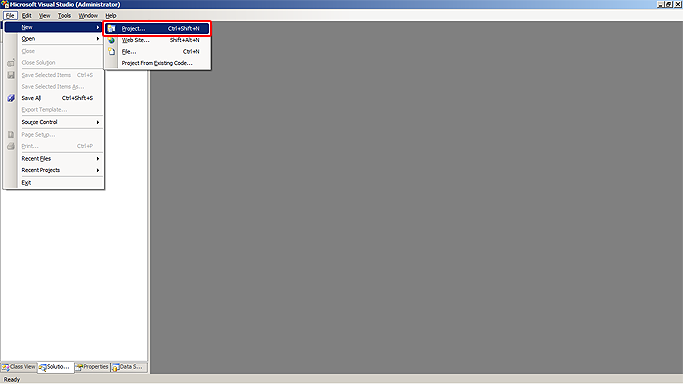
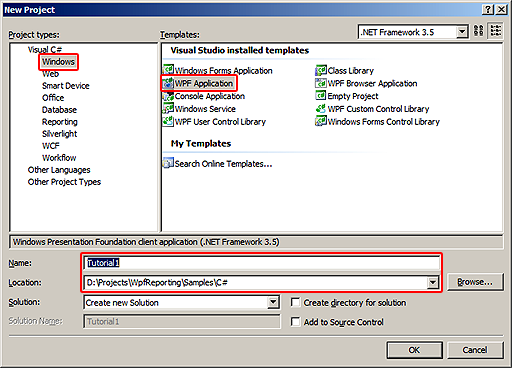
In the dialog box that appears, select the project language and type. Select the desired programming language, then pick the 'Windows' category and select 'WPF Application' from the list to the right. Type the name and the location of the project in the text boxes at the bottom of the dialog, then click 'OK'. This tutorial uses 'Tutorial1' as a name of the project.
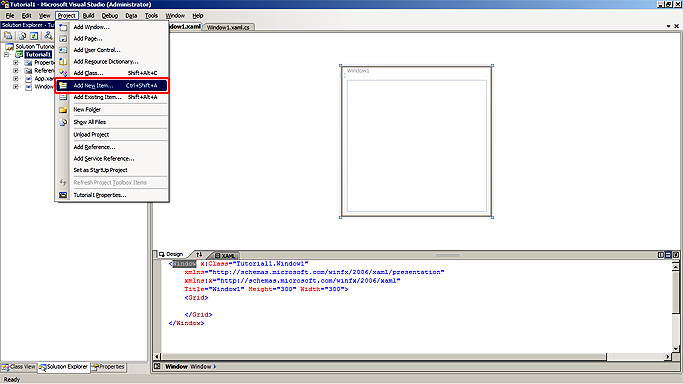
2. Adding a MindFusion report to the project
For the purposes of this tutorial we will create the new report as a resource in a separate resource dictionary. To add a new dictionary to the project, select 'Project -> Add New Item...' menu command.
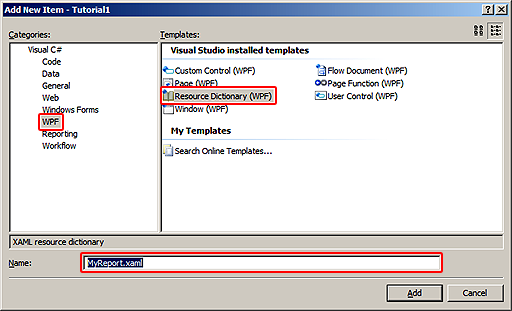
In the dialog box that appears, select the 'Resource Dictionary (WPF)' item in the list, then type the name of the dictionary file in the text box at the bottom of the dialog ('MyReport.xaml' for the purposes of this tutorial) and click 'Add'. If the 'Resource Dictionary (WPF)' item is not visible in the list to the right, select 'WPF' in the tree to the left first.
A new empty resource dictionary is added to the project. Before we can create the report in the dictionary, we need to add a reference to the MindFusion.Reporting.Wpf.dll assembly to the project. To do this, locate to the 'References' item in the Solution Explorer, right-click on it, then select 'Add Reference...' from the context menu. In the 'Add Reference' dialog box that appears, select 'Browse' then navigate to the MindFusion.Reporting.Wpf.dll file and click 'OK'.
Now that the reference to the reporting assembly is added to the project we can create our report. Modify the definition of the newly added resource dictionary definition to include the reporting XML namespace as illustrated below:
XAML
 Copy Code Copy Code
|
|---|
<ResourceDictionary xmlns="http://schemas.microsoft.com/winfx/2006/xaml/presentation" |
Then add the following code to the dictionary:
| XAML
Copy Code
|
|---|
<r:Report x:Key="myReport"> |
The code above declares a new empty report with a single page in it.
3. Adding a data source to the project
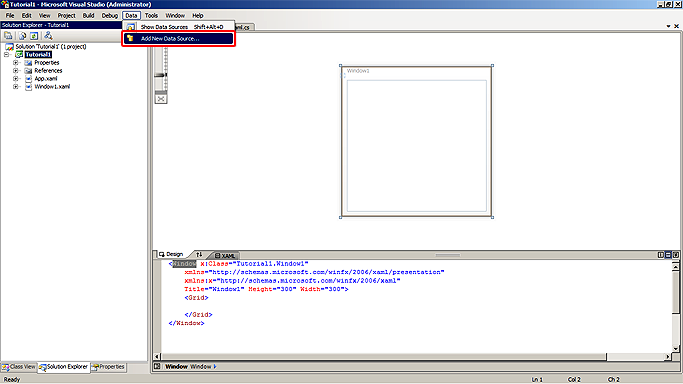
Select the 'Add New Data Source...' command from the 'Data' menu in MS Visual Studio. This will display the 'Data Source Configuration Wizard', which will automate the process of adding a new data source to your application.
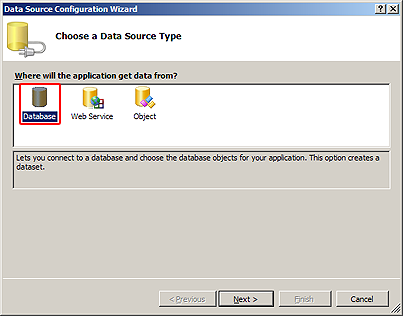
Follow the instructions in the wizard that appears in order to create a new data source. On the first step of the wizard select the type of the data source ('Database' in this particular sample), then click 'Next'.
In the next step of the wizard, set up the database connection.
- Click on the 'New Connection' button and enter the information required to describe the connection in the 'Add Connection' dialog box that appears. This tutorial uses the nwind.mdb file supplied with the project installation as its data source. For this purpose, select 'Microsoft Access Database File (OLE DB)' as a data adapter and enter the path to the nwind.mdb file as a database file name.
- Click 'OK' to close the 'Add Connection' dialog box, then click 'Next' to move to the next step of the wizard. The MS Visual Studio will ask you whether you want to copy the mdb file to your project directory and modify the connection string to reflect this. Select 'Yes'.

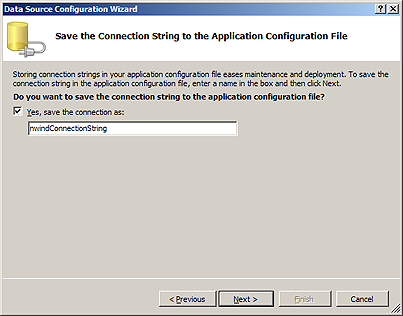
On the following step save the connection under the default name 'nwindConnectionString', then click 'Next'.
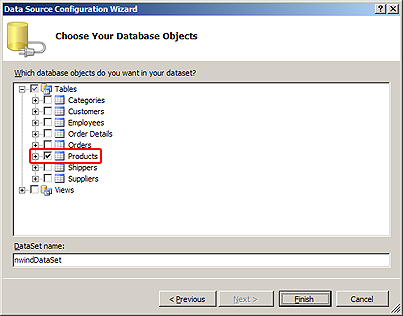
Select the database objects you want to import in the project.
Expand the 'Tables' node and select the 'Products' table by placing a check in the box to its left. Type the name of the imported dataset in the text box at the bottom of the dialog (this tutorial uses the default - nwindDataSet), then click 'Finish'.
4. Instantiating the report
The FromDictionary method of the Report class facilitates report loading from resource dictionaries. The following code illustrates how to load the report myReport from the MyReport.xaml resource dictionary.
| C#
Copy Code
|
|---|
Report myReport = Report.FromDictionary(new Uri(@"MyReport.xaml", UriKind.Relative), "myReport"); |
| Visual Basic
Copy Code
|
|---|
Dim myReport As Report = Report.FromDictionary(New Uri("MyReport.xaml", UriKind.Relative), "myReport") |
Paste this code in the constructor of the main application window - Window1, right after the call to InitializeComponent.
5. Associating the data source with the MindFusion report
The data source is supplied to the report through its DataContext property. This is done manually through code.
The first step is to load the data using the objects created automatically by the Data Source Configuration Wizard in one of the previous steps. Here is the code illustrating how to load the data from the Products table using a TableAdapter:
| C#
Copy Code
|
|---|
nwindDataSet dataset = new nwindDataSet(); |
| Visual Basic
Copy Code
|
|---|
Dim dataset = New nwindDataSet() |
To associate the data source with the report, simply assign it to the DataContext property.
| C#
Copy Code
|
|---|
myReport.DataContext = dataset; |
| Visual Basic
Copy Code
|
|---|
myReport.DataContext = dataset |
6. Creating a data-bound DataRange
In order to display the data from the associated data source, we need to modify our report by adding a DataRange object to it. The following XAML code illustrates how:
| XAML
Copy Code
|
|---|
<r:Report x:Key="myReport"> |
7. Displaying the report
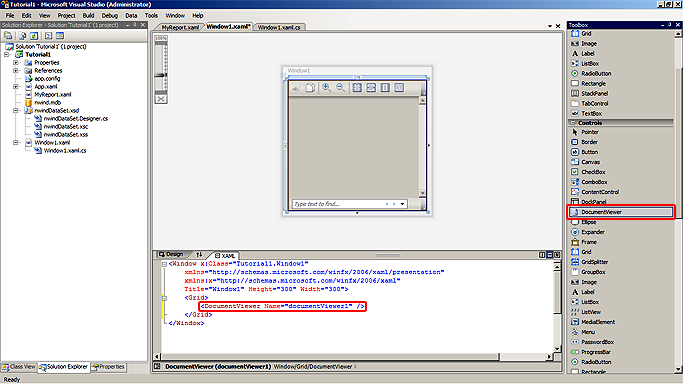
Now that our report is instantiated and its data source has been assigned, we can display it on the main application window. Open the window in the VS designer by double-clicking on the Window1.xaml file in the Solution Explorer.

Open the Toolbox, locate the DocumentViewer item (usually under the Controls tab) and create a new DocumentViewer on the window by double-clicking on the DocumentViewer item in the Toolbox.
Go back to the code behind and add the following code in the window's constructor after the report's data source assignment:
| C#
Copy Code
|
|---|
myReport.Run(); |
| Visual Basic
Copy Code
|
|---|
myReport.Run() |
The code above processes the report and lays it out on A4 paper. The report is then rendered to a FixedDocument using a FixedDocumentRenderTarget object. Finally the FixedDocument is assigned to the Document property of the newly created DocumentViewer in order to display the rendering result in the window. To learn more about these operations, check the Running, Laying Out and Rendering and Displaying Reports in a DocumentViewer topics.
8. Running the application
The application is ready. Compile and run to see the result. After expanding the main application form, it should look similar to the following:
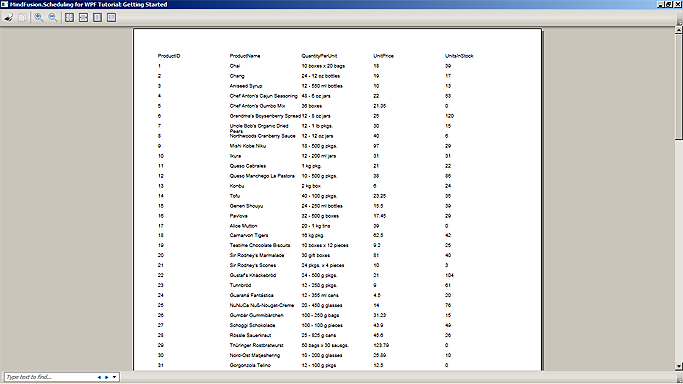
Click the 'Print' button in the viewer's toolbar to print the report.