Building a Tree Reference
Building a Tree
This tutorial teaches you the basic step to create programmatically a tree using the diagram library. The data for the tree is read from an *.xml file.
Basic Settings
We create a project in Xcode which references the diagram library using the steps from the Getting Started guide. We import the Diagramming namespace and declare a variable of type DiagramView that will be used to render the diagram:
import Diagramming
...
...
...
@IBOutlet var diagramView: DiagramView!
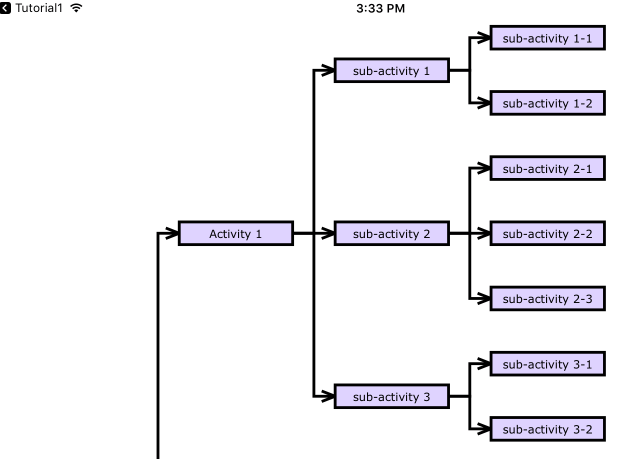
The *.xml file is a list of activities with their subactivities:
<Project>
   <Activity Name="Activity 1">
      <Activity  Name="sub-activity 1">
         <Activity  Name="sub-activity 1-1" />
         <Activity  Name="sub-activity 1-2" />
      </Activity>
....
</Project>
The Diagram: Settings and Data
First we use the diagramView to get access to the diagram object:
let diagram = diagramView.diagram
We then create a Style object and specify some appearance settings for the diagram:
let style = Style()
style.fontSize = 4
style.fontName = "Verdana"
style.fontUnit = MeasureUnit.Millimeter
diagram.style = style
Reading data from the *.xml file is done with the XmlDomBuilder class. We first read the *.xml file as a string and then parse the XML nodes.
Diagram Nodes
We create the DiagramNode-s recursively, starting from the root and calling a method for each branch.
//load the root and it's children
let root = diagram.factory.createShapeNode(bounds: bounds)
root.text = domBuilder.root!.name
createChildren(root, parentElement: domBuilder.root!)
The createChildren method creates DiagramNode-s for each Activity that is child of the element provided as a parameter to the method:
//create children and link them recursively
fileprivate func createChildren(_ parentNode:DiagramNode, parentElement:XmlElement)
{
   var elements = parentElement.children

    for i in 0 ..< elements.count
    {
      let element = elements[i]

      if(element.name == "Activity")
       {

         let node = diagramView.diagram.factory.createShapeNode(bounds: bounds)
         node.text = element.attributes["Name"]!
         diagramView.diagram.factory.createDiagramLink(
            origin: parentNode, destination: node);

         createChildren(node, parentElement: element)
       }
    }
}
We use an instance by the Factory helper class of the diagram library. The Name attribute of each xml element is set as text for the diagram node. The factory also creates a link between each node and its parent. The method is called recursively for each node until the end of the tree is reached. The method uses bounds variable, which was defined beforehead:
var bounds = Rect(x: 0,y: 0,width: 40,height: 8)
Layout of the Diagram
For the layout of the diagram we use one of the predefined algorithms. In this case it is the TreeLayout. In order to use any layout of the diagram you need to create an instance of the class and call the diagram’s arrange method providing the layout as an argument:
//arrange the tree
let layout = TreeLayout()
layout.nodeDistance = 15
layout.levelDistance = 15
layout.linkType = TreeLayoutLinkType.cascading
layout.direction = LayoutDirection.leftToRight
layout.multipleGraphsPlacement = MultipleGraphsPlacement.vertical
diagram.arrange(layout)
Here we specify the distance between nodes and levels in the layout, the general direction of the layout and the type of the links: cascading.
Here is the final result: