


Build a Data Entry Form Using the Window Control
In this tutorial we will build the data-entry form shown below:
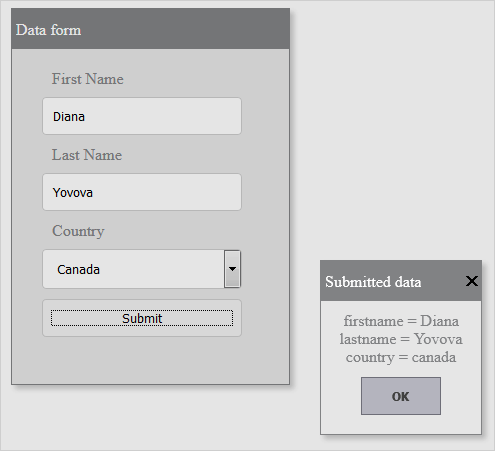
The form will be represented by an instance of the Window control.
In the HEAD section of the web page that will render the form we add following references:
HTML
 Copy Code Copy Code
|
|---|
<script src="drawing.js" type="text/javascript"></script> |
They contain shared code used throughout MindFusion.JavaScript Pack, and the last script implements the controls from MindFusion.Common.UI namespace. If using NPM, it is enough to add a reference to @mindfusion/common-ui package, and the other ones will get pulled as dependencies.
We create a mapping to the MindFusion.Common.UI namespace and then create a Window object:
| JavaScript
Copy Code
|
|---|
var ui = MindFusion.Common.UI; // Create a new Window. Note that each MindFusion.Common.UI Control instance requires an HTMLElement to be associated with. If no such element is provided a new <div> element will be created automatically. In such cases you need to add the Control to the DOM tree of the web page, between calling its draw and attach methods: // Draw the window and append it to the page DOM. // Prepare the window for user interaction. |
The Window class exposes a rich set of properties for customizing the appearance of the control. We use some of them to adjust the looks and behavior of our Window instance:
| JavaScript
Copy Code
|
|---|
// Set the window title // Set the window theme // Set the window visibility to false to avoid flickering during content loading. // Disable interactions. // Set the window templateUrl. |
| HTML
Copy Code
|
|---|
<!DOCTYPE html> <label for="lname">Last Name</label> <label for="country">Country</label> |
We handle the contentLoad event of the Window class class by attaching an event handler method:
| JavaScript
Copy Code
|
|---|
// Add event handlers. |
| JavaScript
Copy Code
|
|---|
function contentLoad(sender, args) |
When the contentLoad event is raised we make the form visible, adjust its size automatically and attach an event handler to the submit event of the HTML form.
When the user presses the submit button the event handler takes the user input and creates an InfoDialog that renders it:
| JavaScript
Copy Code
|
|---|
function postData(e) // Get a reference to the form element and collect the data. // Show an information box with the submitted data and dispose the window. |
The showInputDialog method disposes the dialog, sets the current window as the parent element and colors it with the standard theme.


