


Dynamic TreeView with a Context Menu
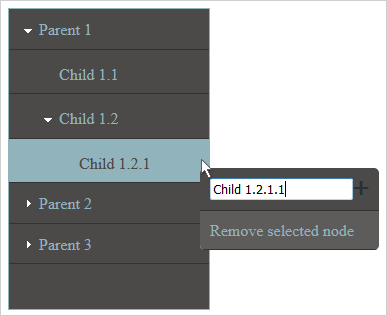
This tutorial will show you how to build a tree using the TreeView control. You will handle the right mouse click event to show a context Menu that adds/removes tree items. You can see a screenshot of the final application below:
You must load the following script files used by the UI controls:
JavaScript
 Copy Code Copy Code
|
|---|
<script src="drawing.js" type="text/javascript"></script> |
We will use a custom CSS style for the context menu. We add the code for it in the <HEAD> section as well:
| CSS
Copy Code
|
|---|
<style type="text/css"> |
We create an array with data to be used by the TreeView. These are nested arrays that assign values to the items and title property of a TreeNode:
| JavaScript
Copy Code
|
|---|
var treeData = [ }, |
| JavaScript
Copy Code
|
|---|
// Create a new TreeView control. |
We set the allowDrag property of the TreeView to false because we don't want the user to be able to change the order of nodes, which is the default behavior for the TreeView.
We create the TreeView through the constructor without parameters. In this case the TreeView will be bound to a newly created <div> element. We need to add this element to the DOM tree of the page, somewhere between calling its draw and attach methods:
| JavaScript
Copy Code
|
|---|
document.body.appendChild(tree.draw()); |
The context menu is an instance of the Menu class. It will not be visible by default and that's why we set its visible property to false. We assign its cssClass property to the "popmenu" class we've created earlier:
| JavaScript
Copy Code
|
|---|
// Create a new Menu control. |
Each Menu has an items property where we add MenuItem instances. In our case we need two: one for adding a new TreeNode under the clicked one and the other for removing the clicked TreeNode. When the user wants to add a new item we give them the possibility to specify the name of the new TreeNode. This is done by an HTML input element, which we assign as a template to the MenuItem:
| JavaScript
Copy Code
|
|---|
var item1 = new ui.MenuItem(); |
The second MenuItem is a simple one: it renders some plain text:
| JavaScript
Copy Code
|
|---|
var item2 = new ui.MenuItem("Remove selected node"); |
We created the Menu once again with the constructor without parameters. That means we need to add it to the DOM tree with elements for the web page as we did with the TreeView:
| JavaScript
Copy Code
|
|---|
document.body.appendChild(menu.draw()); |
First we will handle two events or the TreeView control that are built-in or any HTMLElement: mousedown and contextmenu. We want to hide the deault context menu for the TreeView, which is the stadard one that appears on right-click upon any HTMLElement:
| JavaScript
Copy Code
|
|---|
// Handle the contextmenu JS event to prevent the default context menu from showing. |
The mousedown event is handled by the treemousedown method. In it we check if the right mouse button was clicked. If it was - we calculate the position where we must show the menu object. Then we assign a data to its first item and disable the last item.
| JavaScript
Copy Code
|
|---|
// This is the handler function for tree mousedown JS event. |
| JavaScript
Copy Code
|
|---|
tree.itemMouseDown.addEventListener(nodeMouseDown); |
The event handler method is almost identical to the treeMouseDown event handler with the difference that we take the coordinates of the point where the user has right-clicked from the rawEventArgs object of the args property. The rawEventArgs proeprty is a reference to the JavaScript data for this event:
| JavaScript
Copy Code
|
|---|
// This is the handler function for tree itemMouseDown event. |
The last event that we will look at is the itemClick event of the Menu instance:
| JavaScript
Copy Code
|
|---|
menu.itemClick.addEventListener(menuItemClick); |
We handle it with a method called menuItemClick. The handler method once again receives two arguments: one is the sender, the Menu instance, and the other is an instance of the ItemEventArgs class. In the method we first check which item the user has clicked - remove or add. If it is remove, we need to delete not only the node but also its child-nodes, if any:
| JavaScript
Copy Code
|
|---|
if (args.item.data == "remove") |
If the user wants to add a node we need to get its name. If no name is provided we create it with the name <untitled>. Then we check if the root node was clicked and if yes, we add it to the items of the tree. I not, we add it to the items of the selected node. Finally we clear the contents of the input HTMLElement:
| JavaScript
Copy Code
|
|---|
var input = args.item.element.querySelector("#node_title"); var title = input.value || "<untitled>"; if (args.item.data == "root") input.value = ""; |
At the end of the method we make the menu invisible again:
| JavaScript
Copy Code
|
|---|
menu.visible = false; |


